

Git and Cloud Storage
Connect repositories, backup destinations, and Cloudflare application integration.
The procedures below take place inside the server. The English labels help locate the controls on the screen. Account, balance and hiring belong to the client area.
Connect your Git provider
Where to find: Integration → Git
The screen features Bitbucket, Github and Gitlab, each with Information and Link. The bottom list shows provider, email and actions of linked accounts.
- Open Integration and select Git.
- Read Information from the desired provider to check the requirements.
- Select Link Github, Link Gitlab or Link Bitbucket.
- In the provider, check the account and scope of access requested before authorizing the link.
- Return to the panel and confirm the integration into the table. Use the provider and Search filter to locate the account.
- When creating the application, choose Git and the same provider to publish your repository.
Publish code through Git and follow updates
Where to find: Applications → Create an Application → Git
Preset repository, branch, runtime version, and public directory. Publishing a wrong branch changes the content of the site.
- Please enter the name and domain of the application.
- Select Git in Select a Method and choose Bitbucket, Github or Gitlab.
- Complete the account, repository, and branch options that the panel displays after selecting the provider.
- Check out the advanced system user options, PHP and Custom Webroot.
- Review build requirements and project configuration. If there is deploy script field, use only required and tested commands.
- Complete the creation and follow the records of the deploy and the published domain.
- In the application Git tools, when present, check the branch before manually updating or setting up automatic update. Test the application after each deploy.
If the result is not expected
Account or repository does not appear
Check the link in the integration, provider permissions, and selected account.
Deploy finished, but page fails
Check out webroot, dependencies, runtime, environment variables and database connection.
Push does not update the site
Check if automatic update has been enabled, branch and webhook delivery configured.
Connect a storage destination
Where to find: Integration → Cloud Storage
Cloud Storage offers Google Drive, Dropbox, Amazon S3, S3 Compatible Storage and Wasabi. The destination needs to be linked before being selected in a backup.
- Choose the provider on the Cloud Storage screen and read Information.
- For Google Drive or Dropbox, select Link and complete the authorization in the destination account by checking the requested access.
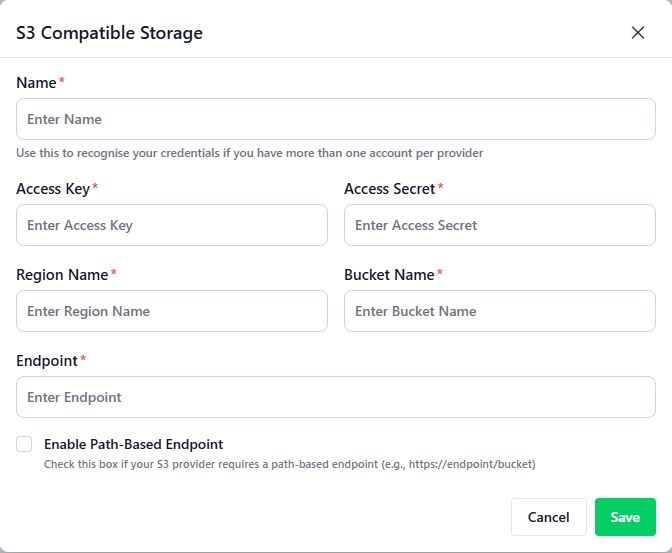
- For Amazon S3, Wasabi or S3 Compatible Storage, open Link and fill in your provider's credentials and bucket.
- Use Name to identify the destination; inform Access Key, Access Secret, Region Name and Bucket Name.
- In S3 Compatible Storage, please also inform Endpoint. Bookmark Enable Path-Based Endpoint only if the provider requires the access format by path.
- Review the data and click Save. Confirm integration in the bottom table.
- Open the backup form and confirm that the destination appears in Storage Provider. Create a test copy of the project and check out the result and files in the destination.
Understand the fields and options
- Name
- Name recognizable to differentiate destinations and accounts.
- Access Key / Access Secret
- Storage access credentials, not the panel password.
- Region Name
- Region used by the bucket, with the identifier required by the provider.
- Bucket Name
- Exact name of the bucket that will receive the files.
- Endpoint
- Supported S3 service API address.
- Enable Path-Based Endpoint
- Access mode by path, when required by the provider.
If the result is not expected
Storage Provider Empty
Check if there is a saved integration and update the backup screen.
Authentication failed
Review key, secret, permissions and provider account.
Failed to locate bucket
Check out exact name, region, endpoint and mode by path.
Failed after previous operation
Check quota, expiration of authorization, revocation of keys, and change of permissions.
Link the Cloudflare area of the application
Where to find: Application → Cloudflate Integration → Integrate
The integration requires Bearer Token and Zone ID to manage DNS. Check if the zone matches the application domain.
- Open the correct application and select Integrate in the Cloudflare Integration group.
- In your Cloudflare account, get the API token and zone identifier needed for integration.
- Fill out Bearer Token and Zone ID.
- Check token domain, zone, and permissions before clicking Integrate Now.
- After the link, check the DNS actions that the panel makes available and test the domain resolution after any change.
Updated October 8, 2026.
Consult other guides